The action RPG debuted with incredible success for Xbox One, Xbox Series, PS4, PS5, and Windows. It is as phenomenal as it is tough, so you may want to use its limited multiplayer features to progress. Therefore, you want to know how to fix Elden Ring not connecting to the network.
Miyazaki’s latest game has connection errors that may kick you out of the game or prevent you from using the Ring’s multiplayer feature. That may present itself in two ways: you can’t summon someone else to your campaign, or you can’t join another player’s scenario.
These hindrances may happen on PS4, PS5, Xbox One, Xbox Series, and Windows. Most of the issues are related to the game’s servers. Let’s face it: Elden Ring’s multiplayer is creative but not exactly flawless.
Sadly, these network issues can tarnish an otherwise quality and immersive title. How will you defeat the Lands Between bosses without your friends?
Probable Error Messages
You may experience the error with a screen with a message like these:
- “Unable to connect to the network.”
- “Network status check failed.”
- “Elden Ring cannot connect to server.”
- “Unable to summon cooperator.”
- “A connection error occurred.”
Elden Ring Not Connecting to Network Causes
Regardless of the message, the error may crash the game or prevent you from playing co-op. The network problem won’t allow you to play PvP, either.
Various factors could lead to this problem on Steam, PS4, PS5, Xbox One, or Xbox Series. Pinpointing the culprit may help you solve the issue faster.
- Light Network Bugs: Due to various network bugs, you will see various errors when you try to summon another player or try to join another player. These bugs may also be due to wrong in-game configurations. There’re also various workarounds to avoid facing these minor bugs.
- The Problem Is on The Server: Either the game’s servers or Steam’s servers are down for maintenance. There’s not much you can do but wait, but you can check the server status.
- Your GPU or Wi-Fi: Drivers are out of date: keeping your drivers up to date is the definitive way to keep your computer in shape. Outdated drivers may cause bugs. In particular, Elden Ring came out in 2022, so it needs the latest GPU drivers to work properly.
- Outdated Software: Your console is not updated: similarly, it doesn’t have its latest software update. This will also cause various network compatibility issues.
- The Files Are Corrupted: Steam may suffer from corrupted or lost files. This may happen during Windows updates, Steam updates, reinstallations, game updates, and Steam updates. You can use Steam to repair the database.
- Your Internet Connection Is Poor: You need a stable connection to use the multiplayer features on games on Steam. Most platforms recommend an average of 10mb/s. If your internet is slower, it could be hard to make it stable enough, but there’re a couple of tricks you can try.
- NAT Type Limitations: The NAT Type (Network-Address-Translation) comes in-built with the router. It determines the ability of your home devices to share and consume online content. That includes joining multiplayer lobbies or hosting multiplayer lobbies. You “port forward” your router via the Windows Firewall to change the Nat Type. For Xbox or PlayStation, we’ll need to re-address you to an additional guide.
- Severe Random Game Bugs: Ultimately, Elden Ring may have a bug Steam can’t fix. You can try reinstalling the game to ensure everything is working fine.
How to Fix Elden Ring Not Connecting to Network?
Let’s go through the troubleshooting. We’re starting with easy solutions and climb our way to the most complex fixes. Our solutions cover Windows 11, Windows 10, PS4, PS5, Xbox Series, and Xbox One.
Naturally, some of these solutions are the same across all devices. Other times, the fixes are only available for Windows.
You can try them individually until you find your Flask of Crimson Tears.
Enable Cross-Region Matchmaking
Another quick fix is to enable Cross-Region Matchmaking in-game. You can find the option on Settings – Network.
After you enable the option, try joining a co-op session once again.
Turn on The Voice Chat
We’ve seen this solution on Reddit, so you should also try it because it takes a few seconds.
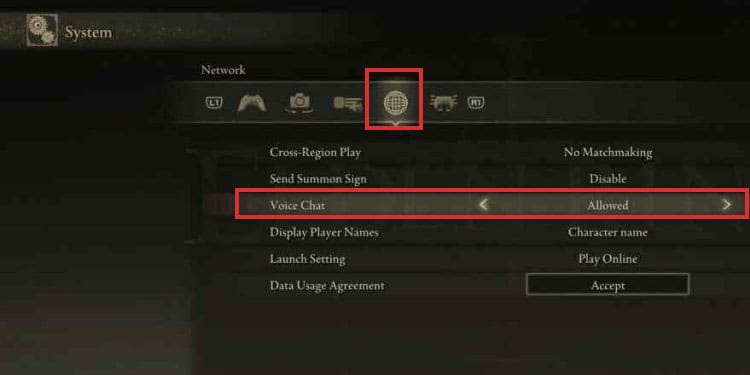
Go to the game’s Settings – Network menu, and select Allowed on Voice Chat. I know it sounds weird, but it may be a solution that doesn’t require you to do anything crazy.
Restart Elden Ring
Martyr Effigy sculptures allow you to see summoning signs. Here, you can agree to help another player in their world.
By this point, if you see a “Connection Error,” it could be that another player is trying to join your game simultaneously or just a couple of minutes ago.
Similarly, the sign may not disappear for about 2 minutes after using a summoning sign. So, if you try to summon again during this short spawn, you will also see an error.
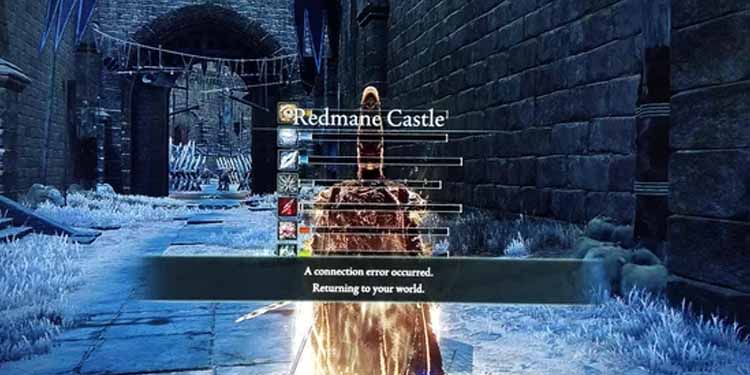
There are many errors like this; the culprit is how the Elden Rings servers work. Your solution for these cases is to restart the game and open it again after a few minutes.
So, anytime you see “A connection error occurred” or “Unable to summon cooperator,” try restarting the game.
Try Using Another Furlcalling Finger Remedy
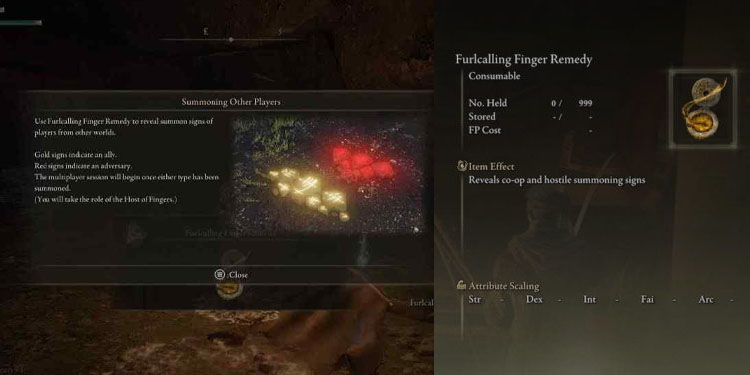
The Furlcalling Finger Remedy allows you to see Summon Signs across the Lands Between.
You need to use the item to launch a multiplayer session. Specifically, the Furlcalling Finger Remedy makes you visible to other players.
Suppose you see connection errors after using a Finger Remedy. In that case, you can fix it by using another one of these items. This will remove the Signs you already used. Try it several times to make the error go away.
Check the Server Status
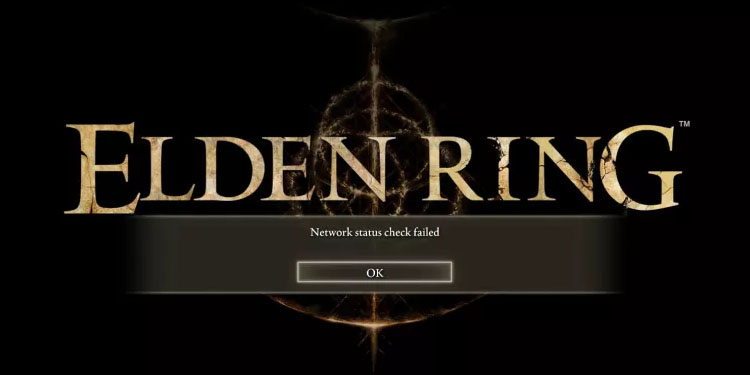
The error may come from Elden Ring servers. Sometimes, they go down due to bugs or maintenance reasons.
You can check the server status on the game’s Twitter feed.
Update Windows and GPU Drivers
Your computer needs to be up to date to handle the latest hardware. So, you have to update Windows and the GPU drivers.
Update Windows
Here’re the steps to update Windows 10 and Windows 11:
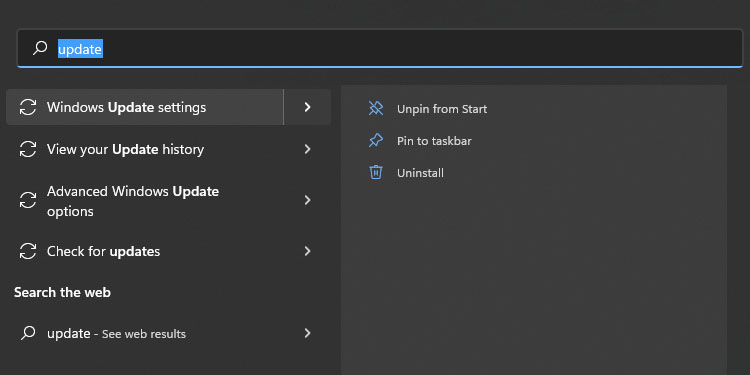
- Click the Windows icon and type “Update” on the search bar.
- Click “Windows Update Settings.”

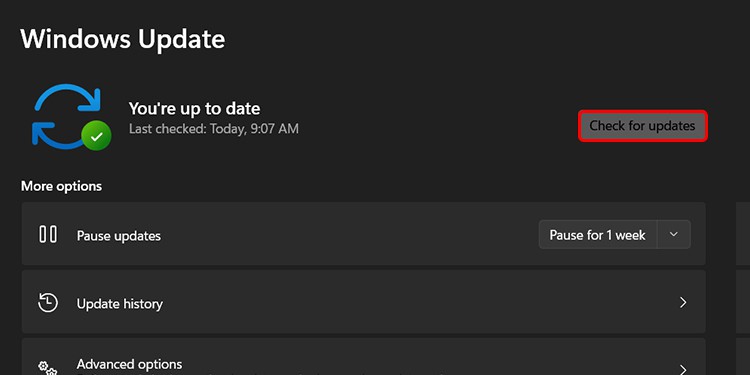
- Click Check for Updates.” Otherwise, click “Download & install updates” if you see any available updates.

Update the GPU Drivers
There’re two ways to update GPU drivers. The first way is by downloading and installing your card’s proprietary hardware:
After you install the software, you’ll find available driver downloads on its main page (AMD) or the Driver tab (NVIDIA). 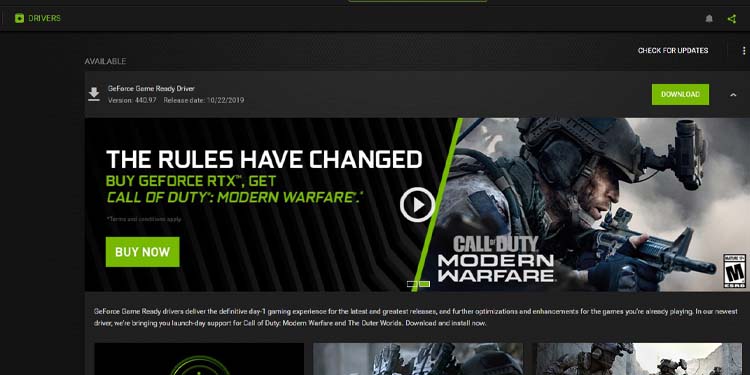
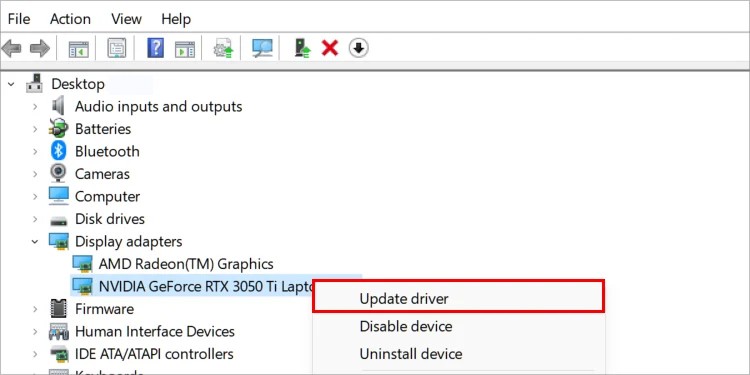
The second way is via the Device Manager. This method is fast and easy, so here’re it is:
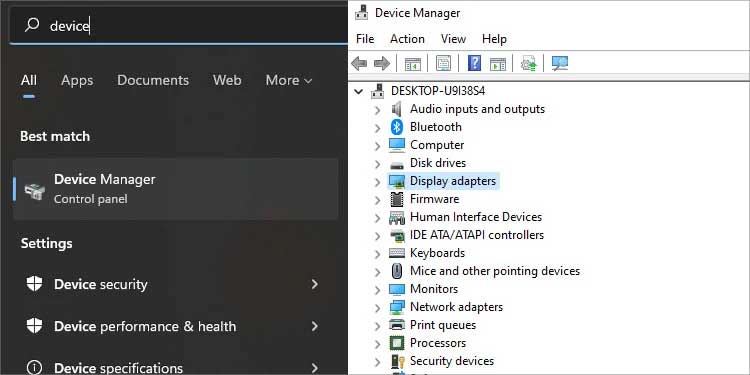
- Click the Windows button and type “device manager” on the search bar.
- Click “Device Manager.”
- Find “Display Adapters” on the list and click it.

- Right-click your GPU. It’s usually second on the list, either an NVIDIA or an AMD unit.
- Select the first option on the menu: “Update driver.”

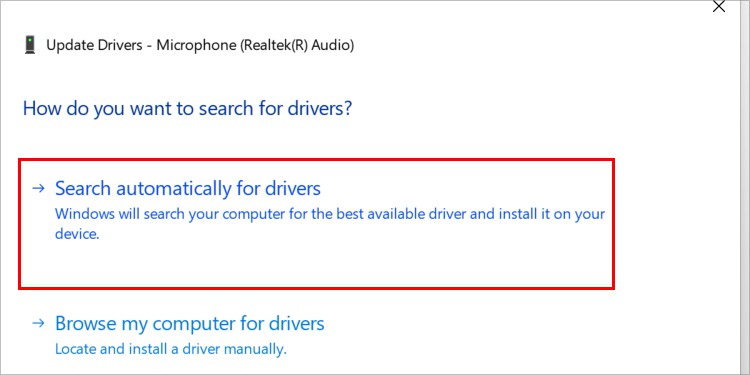
- Select “Search automatically for drivers.”

- Windows will find available drivers and install them on your computer. If there’re no available drivers, it will let you know.
Verify the Files on Steam
Steam users should verify the files on Steam to try to fix Elden Ring’s network issues:
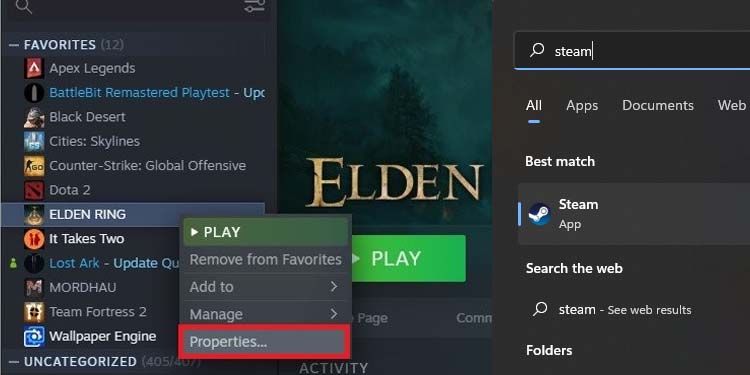
- Open Steam.
- Go to your Library tab.
- Right-click Elden Ring and then select Properties.

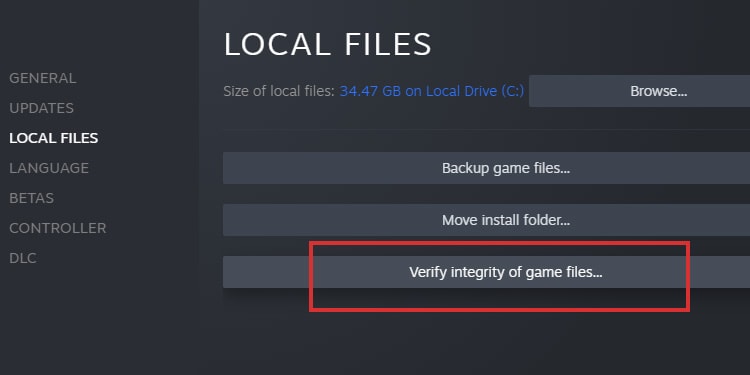
- Go to Local Files to the left.
- Click “Verify integrity of game files.”

The process may take a while. If it finds corrupted or missing files, it will re-download the data.
Flush the DNS
Another option for Windows users is to flush the DNS. This deletes the computer’s DNS cache to erase network bugs. Here’s how to do it:
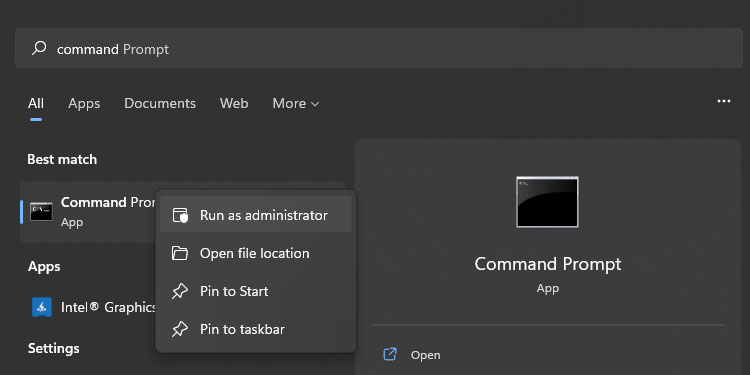
- Click the Windows button and type Command Prompt.
- Right-click Command Prompt and select “Run as administrator.”

- Copy and paste the following command and press Enter:
ipconfig /flushdns
- Close the command prompt.
You can try playing Elden Ring again. Perhaps this is all you need.
Update Your Console
If you’re playing on a console, you must also update its software. This should happen automatically, but the console may have missed an update if your connection is slow.
Alternatively, the console may have suffered an update interruption recently (for example, due to a power surge). In any case, let’s break down the manual update process:
On PS4
Here’s how to update the PS4:
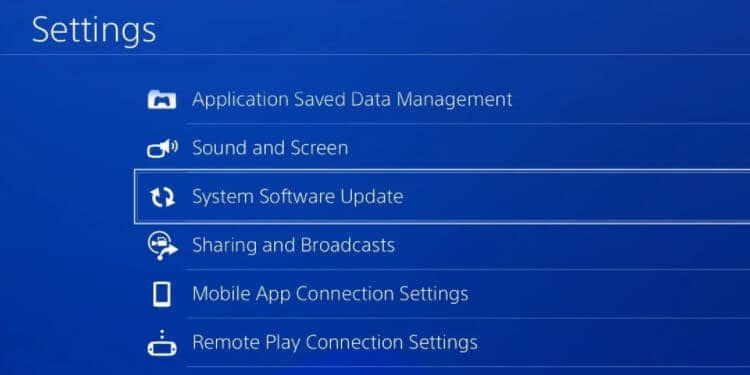
- Select Settings.

- Select System Software Update.

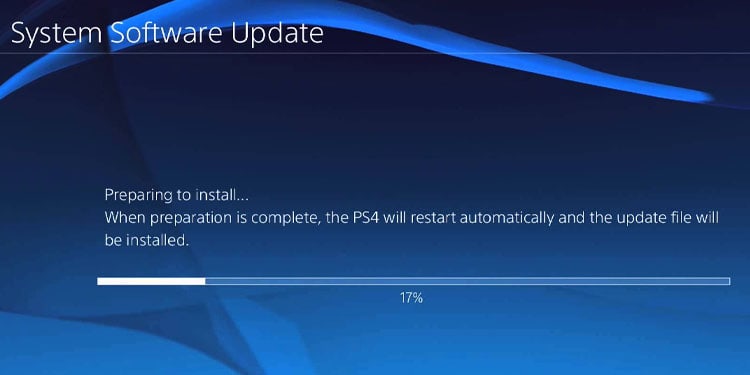
- If there’s an available update, select it. The console can update in the background as you play or watch media.

On PS5
Here’s how to update the PS5:
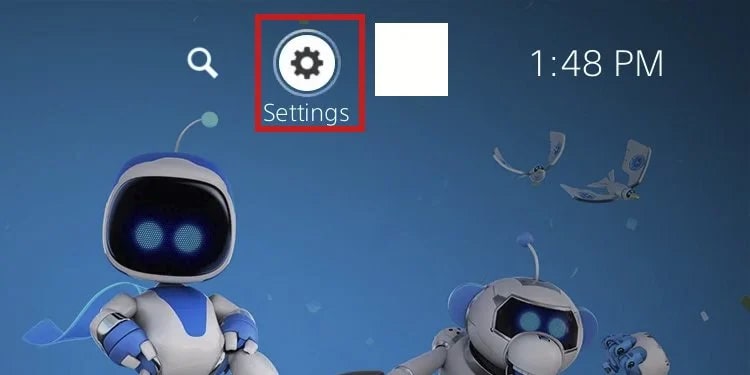
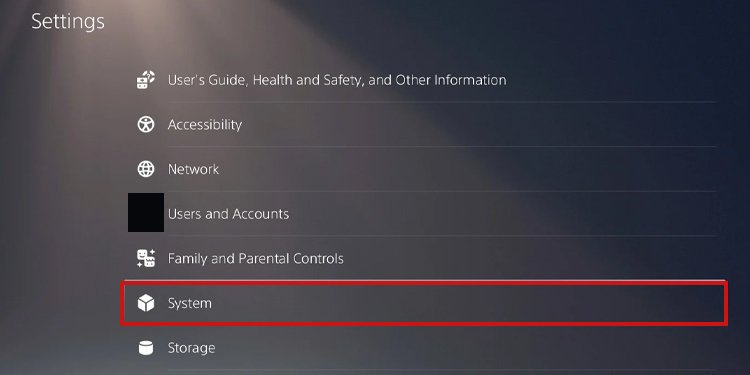
- Go to Settings.

- Go to System.

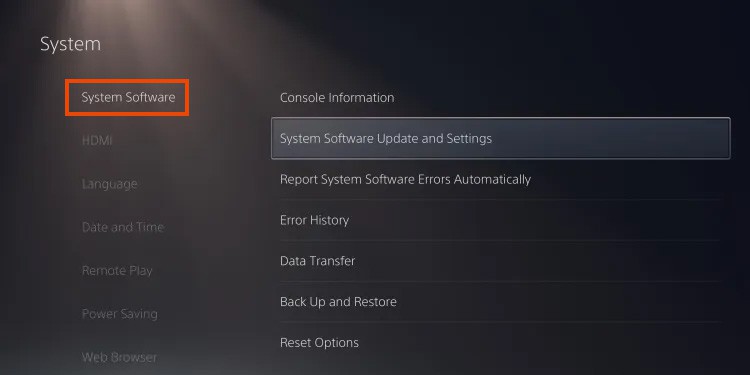
- Select System Software.
- Select System Software Update and Settings.

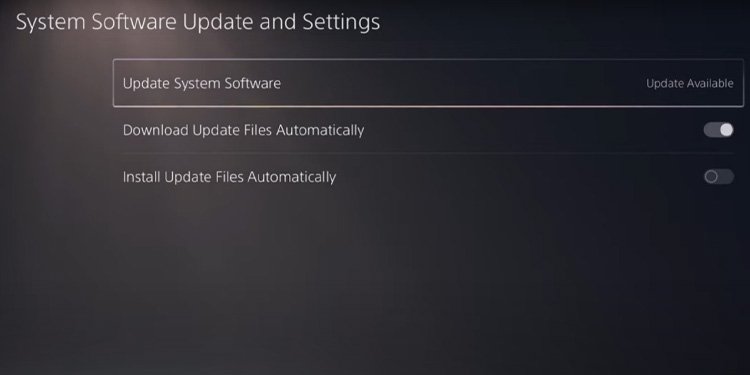
- If there’s an available update, select it. Also, enable “Download Update Files Automatically” and “Install Update Files Automatically.”

On Xbox One or Xbox Series
Lastly, here’s how to update Xbox consoles:
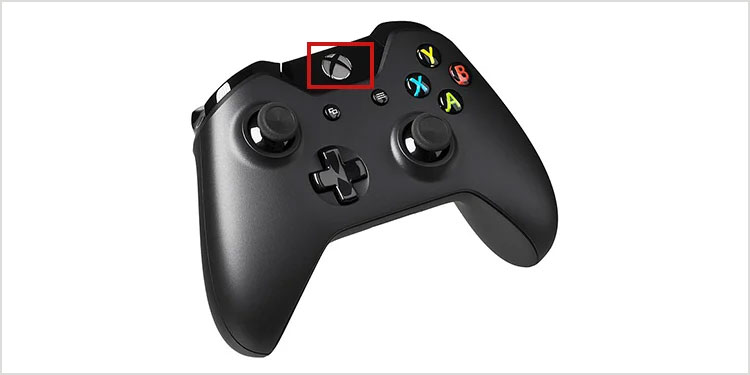
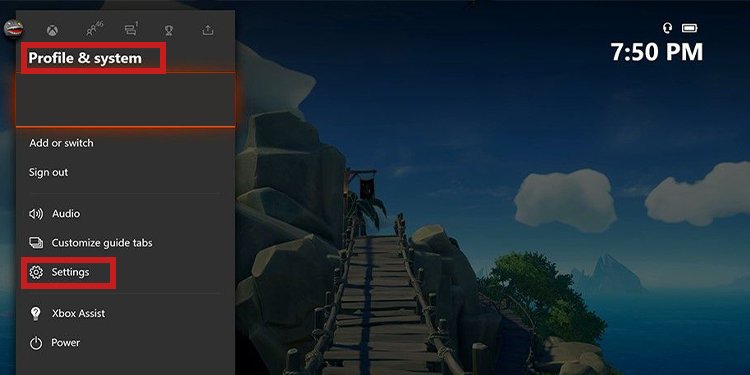
- Press the controller’s Xbox button.

- Go right to Profile & system.
- Select Settings.

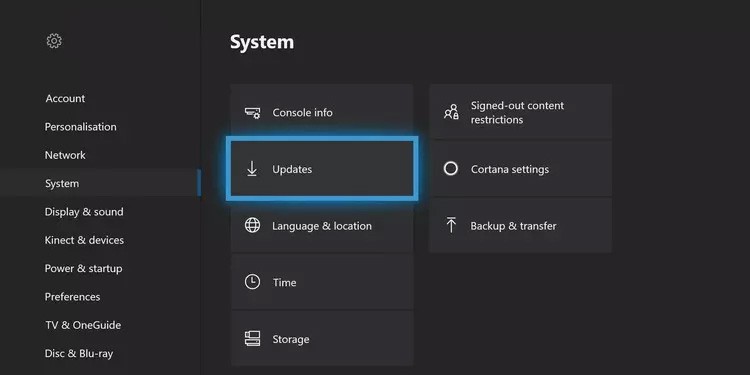
- Go to System.
- On the right, select Updates.

- Select the available update if there’s one.
Use a Public DNS
The Domain Name System (DNS) takes care of translating IPs into names your devices can understand. The better a DNS system is, the shorter load times you will have as you browse and play online.
The DNS comes with your internet service provider, but you can change it to a public DNS. A public DNS is something tech companies like Google or Cloudflare offer for free to improve worldwide connections.
On PS4
Let’s start by adding a public DNS to the PS4:
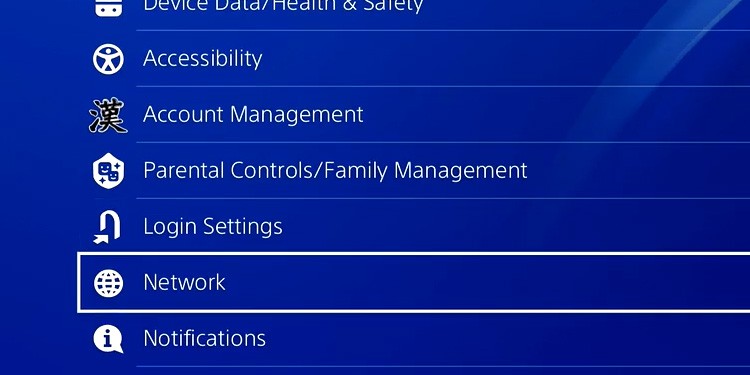
- Go to Settings.

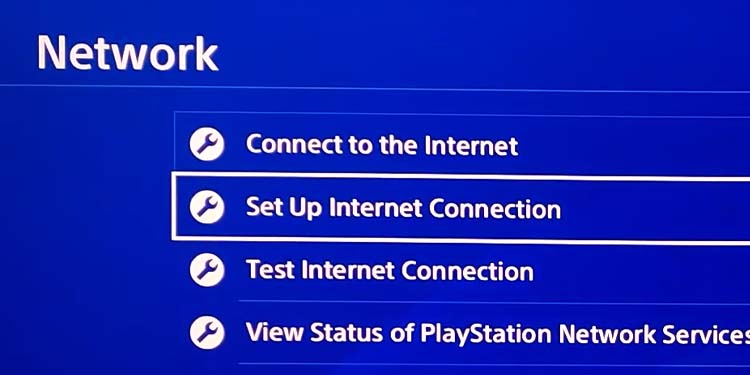
- Go to Network.

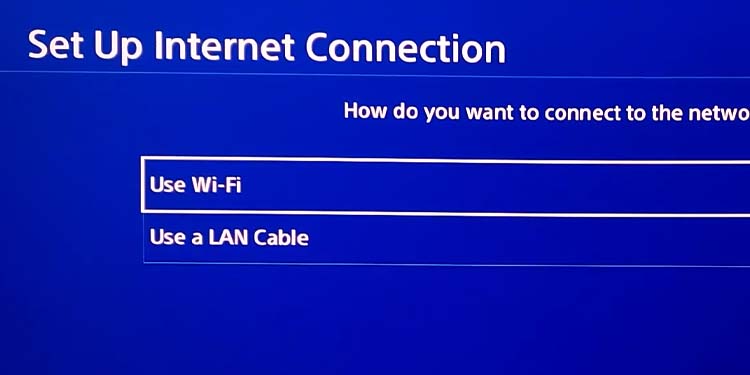
- Select Set Up Internet Connection.

- Select WiFi or Lan Cable. If you must, select your WiFi network and type your password.

- Select Custom on the next page.

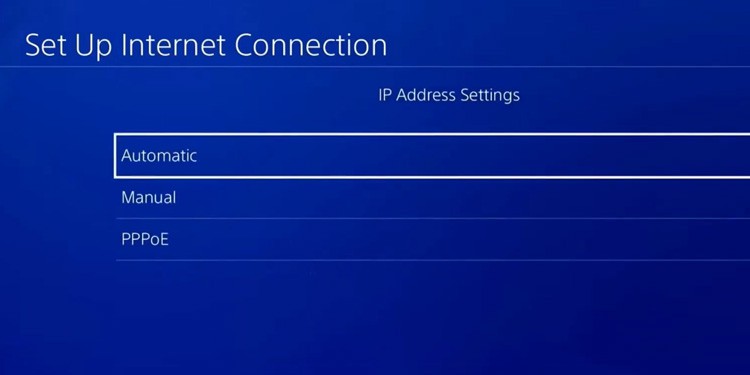
- Select Automatic on the IP Address Settings page.

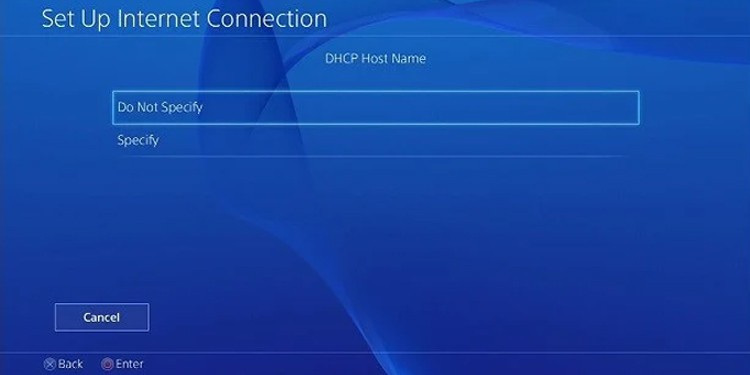
- On DHCP Host Name, select Do Not Specify.

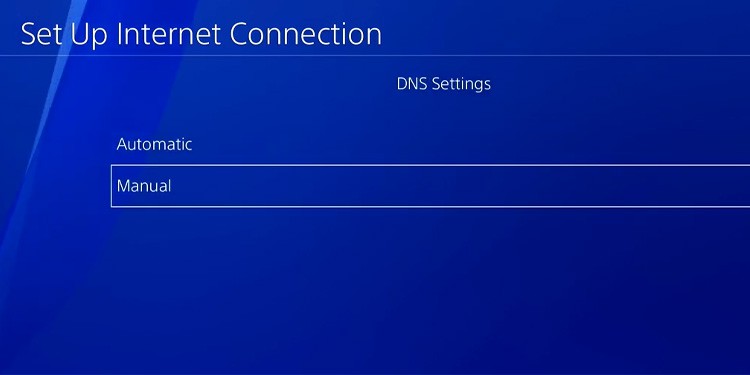
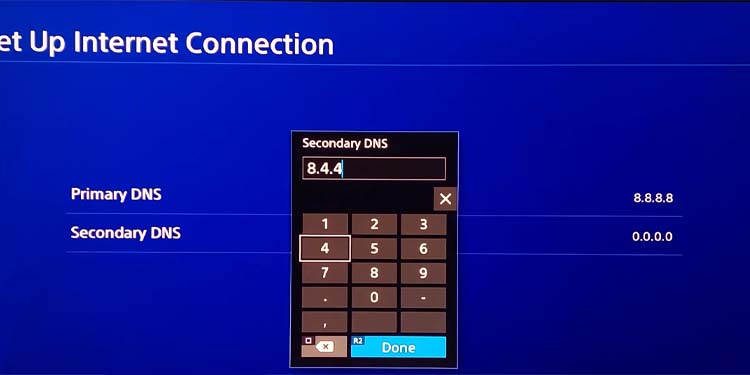
- Go for Manual on DNS Settings.

- Input Google’s Primary and Secondary DNS (we recommend it for gaming):
Primary: 8.8.8.8
Secondary: 8.8.4.4
- Finish by selecting Next.
On PS5
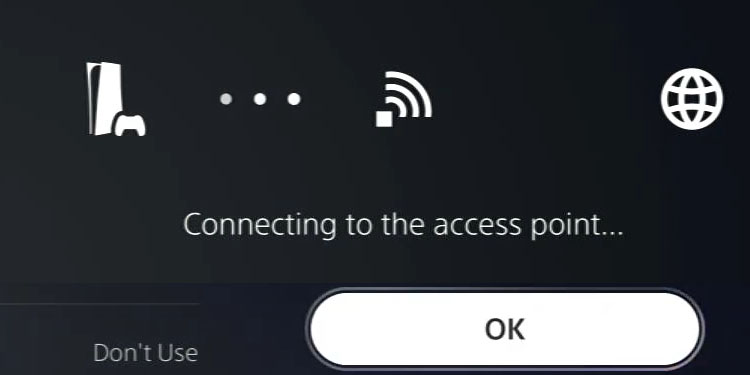
We always recommend adding a public DNS to the console, as it’s one of the ways to make the PS5 faster. Anyhow, here’re the steps:
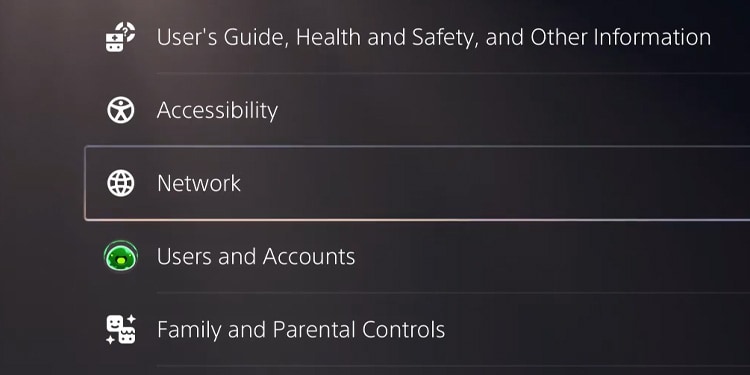
- Go to Settings.

- Select Network.

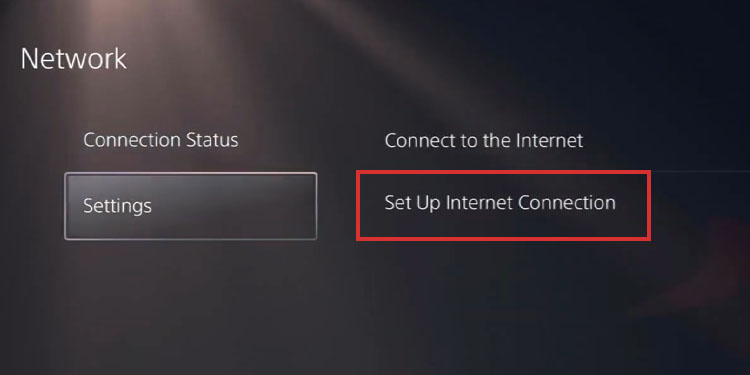
- Select Settings on the left side. On the right side, select Set Up Internet Connection.

- Choose WiFi or Lan, depending on your setup. Then, if you must, select your WiFi network and type your password.
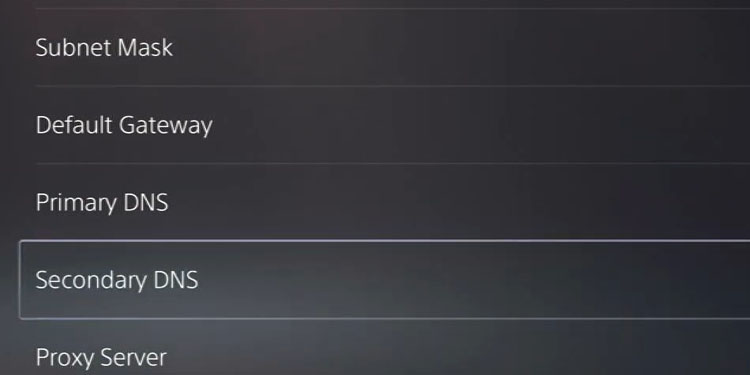
- Type Google’s DNS option:
Primary: 8.8.8.8
Secondary: 8.8.4.4
- Confirm by selecting Ok.

On Windows 11
Here’re the steps to add public DNS on Windows 11:
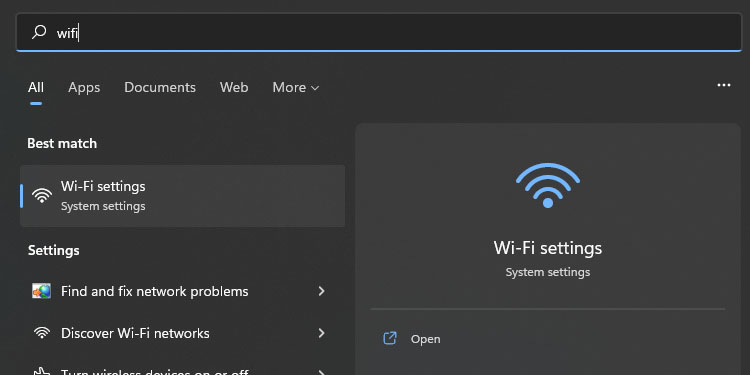
- Click the Windows icon and type “WiFi settings” on the search bar.
- Open WiFi Settings.

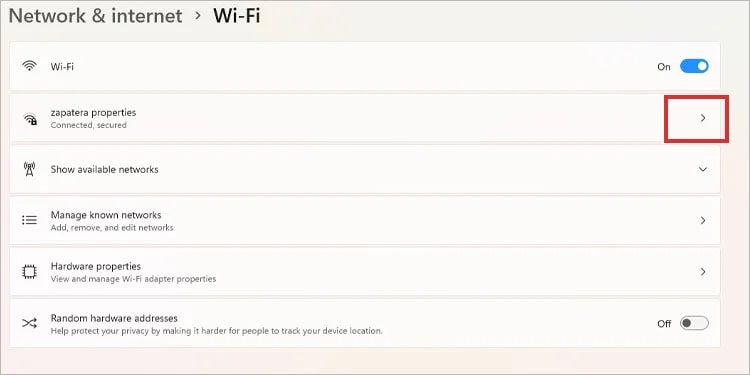
- Click the Properties tab.

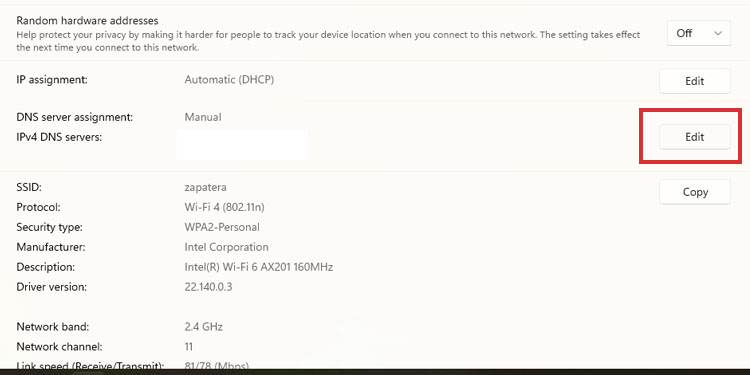
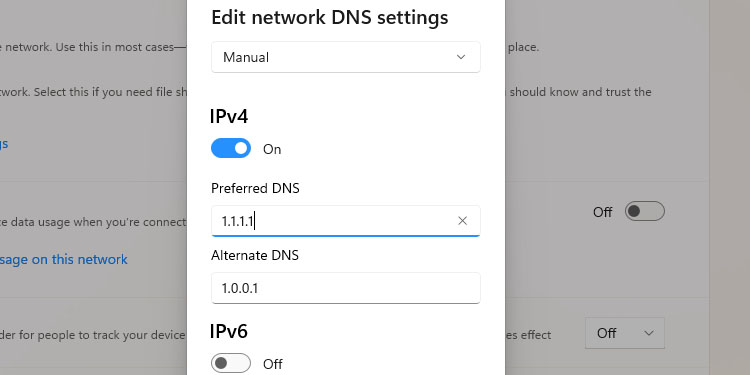
- Click Edit on the DNS tab.

- Toggle on IPv4 and type Cloudflare’s DNS – Primary: 1.1.1.1 / Secondary: 1.0.0.1

On Windows 10
Lastly, here’s what Windows users should do:
- Type Control Panel on the Windows search bar, and open Control Panel.

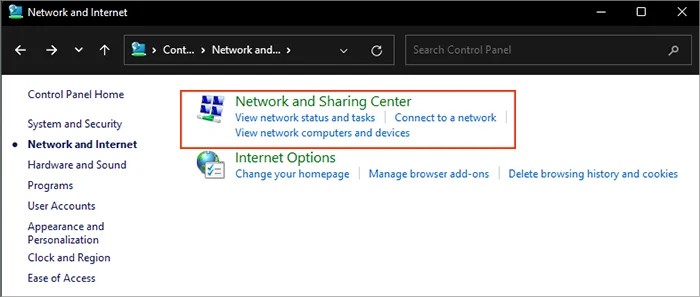
- Go to Network and Internet.
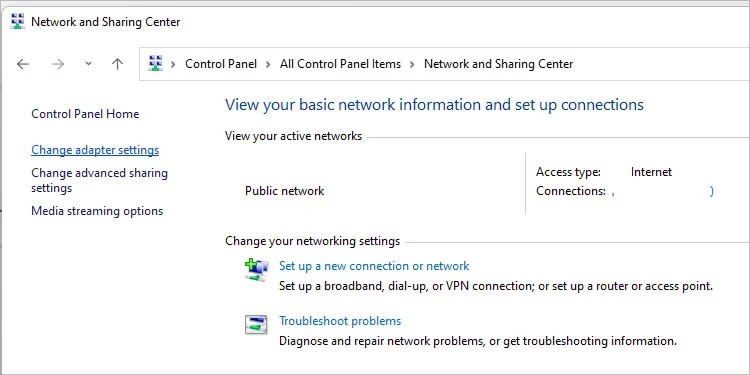
- Go to Network and Sharing Center.

- Select Change adapter settings.

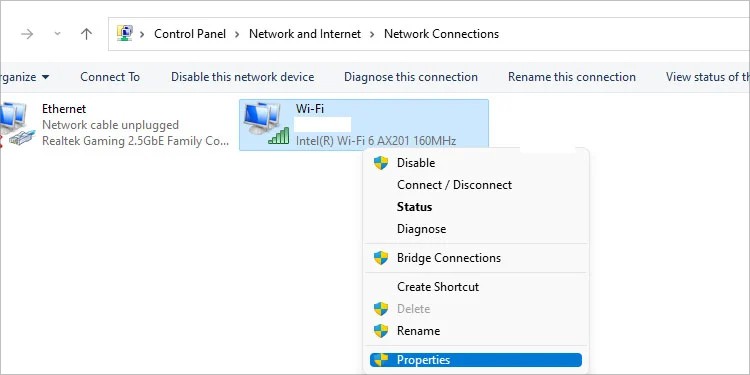
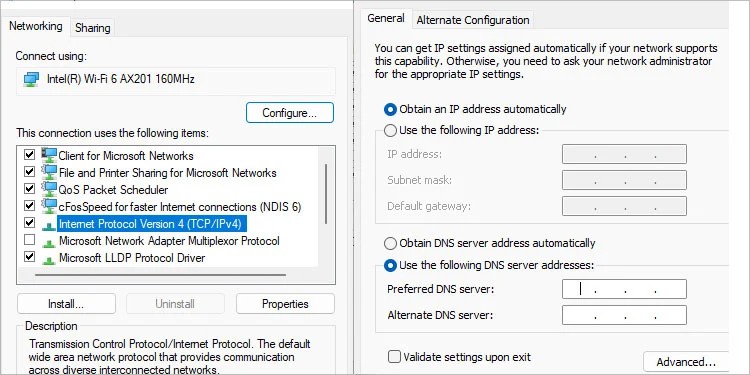
- Right-click your network and select Properties.

- Double-click the IPv4 bracket.
- Check “Use the following DNS address.

- Type Cloudflare’s public DNS: Primary: 1.1.1.1 / Secondary: 1.0.0.1
Port Forward the Router
Your router comes with a built-in NAT configuration. The NAT (network address translation) comes in three categories, and it determines how your home devices can interact with other devices online.
| NAT Type | Open | Moderate | Strict |
|---|---|---|---|
| Open | Yes | Yes | Yes |
| Moderate | Yes | Yes | No |
| Strict | Yes | No | No |
The most severe type, “Strict,” will limit your online features completely – not even voice chat would work. A “Moderate” type won’t let you play with another person using a “Strict” NAT. An “Open” NAT type can interact freely with any category.
The way to change the NAT is by accessing the router and tweaking some configuration, in specific, to port forward the device.
Port forwarding means telling an internet-connected device to use the ports of private networks when they use specific services. That way, the devices can bypass the default NAT configuration on the router.
Port forwarding is a lengthy process on consoles, so you should check the separate guide for PS4/PS5 and the separate guide for Xbox One and Xbox Series.
Realize this is the way to go if you experience constant network errors while playing on the console.
As for Windows PCs, the process is significantly easier, and it can make your online gaming faster. The idea is to add Steam’s ports to the Firewall.
Here’re the steps to port forward your router via the Windows Firewall:
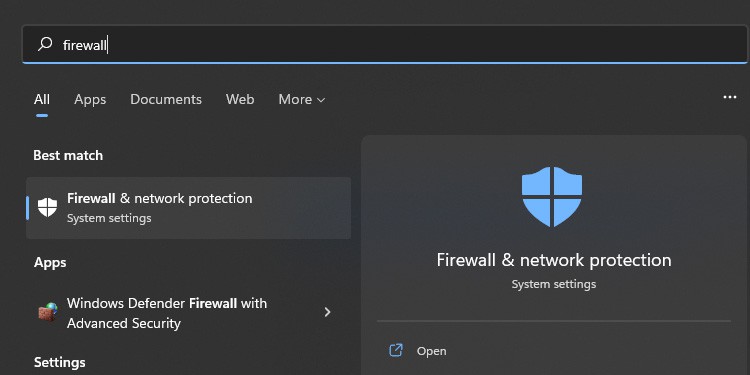
- Click the Windows button and type “Firewall” on the search bar.
- Click “Firewall & network protection.”

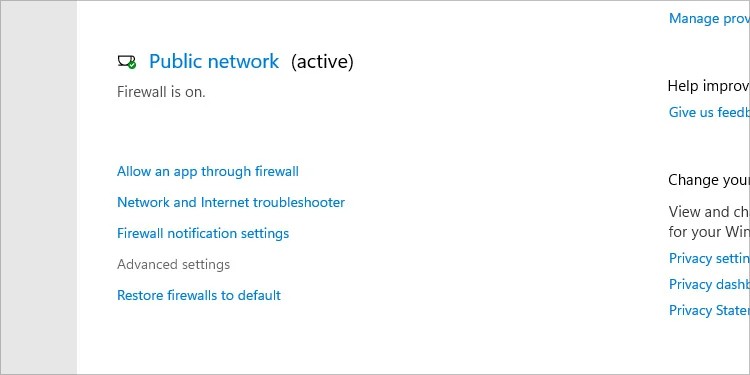
- Go to Advanced Settings.

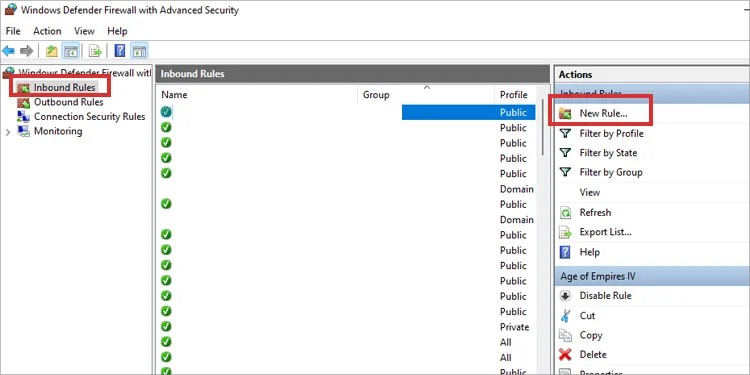
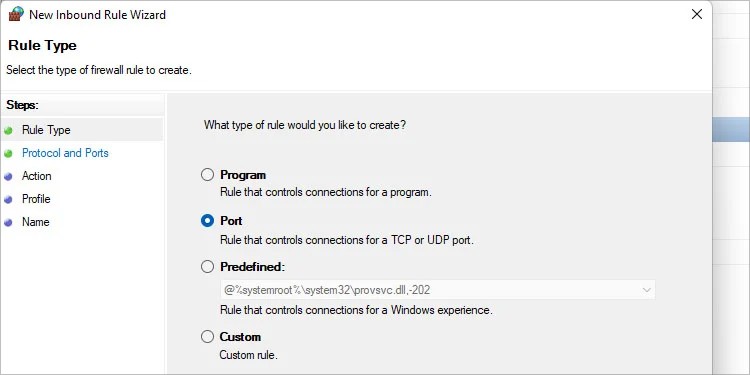
- On the left, select Inbound Rules. On the right, click on New Rule.

- Select Port on Rule Type.

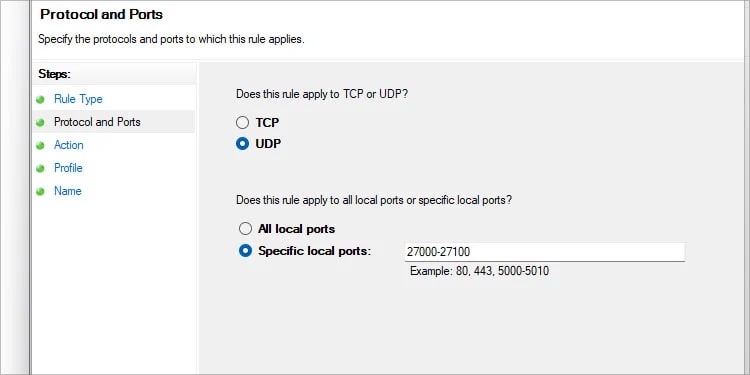
- Steam’s ports for gaming are 27000 or 27100 UDP. So, select UDP at the top, and add copy-past numbers on Specific local ports.

- Click Next.
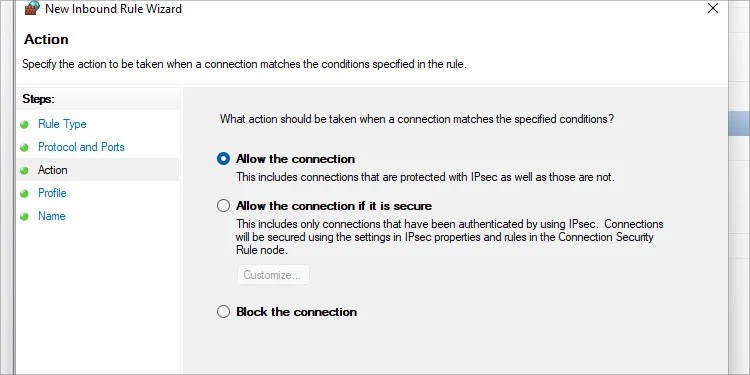
- Check “Allow the connection.”

- Click Next.
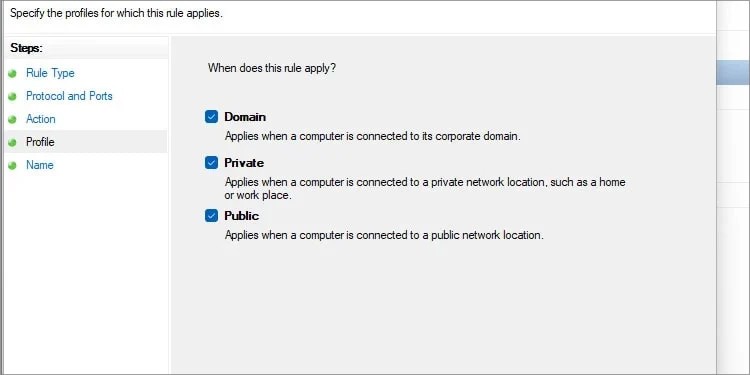
- Don’t do anything on the Profile page (everything should be checked).

- Click Next.
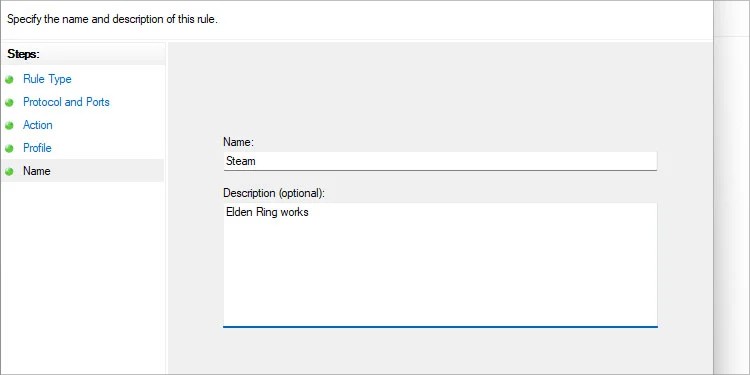
- If you wish, type a name for the server.

- Click Finish and restart your PC.





Be the first to comment