There’re general errors on the PS4 that prevent you from playing some of its most important games. For example, after opening a AAA game, you may have come to learn how to fix CE-34878-0 PS4 error code.
Let me be clear; this can be a troublesome problem. That’s because it pertains to a bug affecting the system itself or your storage drive.
Luckily, we can still solve it quickly if we go right down to the core of the issue. And we’ll try to do it without losing data.
What Cayses CE-34878-0 PS4 Error
The CE-34878-0 PS4 error code happens when the console fails to run a game or an application.
It’s an error on the console’s framework. The framework is a layered structure code that sorts programs into categories. That said, the error occurs when the framework doesn’t find the files it needs to understand the apps you’re trying to open.
In other words, there’s corruption in your system or the game/app you’re opening broke. It’s hard to pinpoint the origins of the error, but you need to understand it’s a firmware-related problem.
How to Fix CE-34878-0 PS4 Error Code?
We’re running down the list of solutions for this particular PS4 error. We encourage you to try one by one until you find the one that solves the CE-34878-0 PS4 error you’re facing.
Update the Console
The first step is making sure the console has its latest software update. Newer updates can iron out bugs and glitches on the firmware.
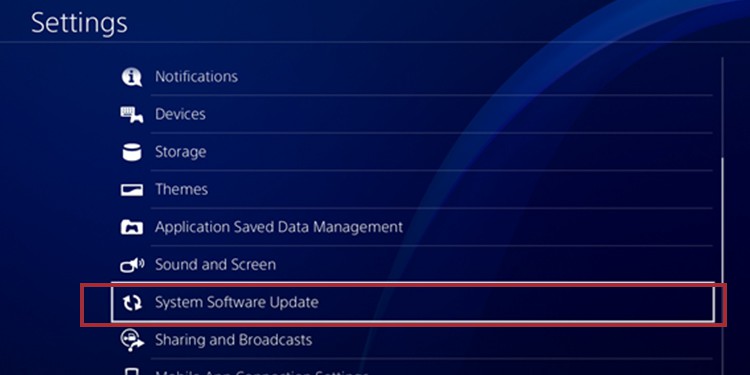
- Select Settings.

- Select System Software Update.

- If there’s an update, select it and let it download in the background.
Update the Game Manually
The second step is ensuring the app or game is up to its latest version. Similarly, updates can solve bugs and glitches, particularly if the bug comes from the developers.
- On your Home Page, hover over to the game you want to update.
- Press the Options button on your controller.

- Select Check for Update on the side menu.

- If no updates are available, you’ll see “The Installed application is the latest version.”

- If there’s an update, select Go To – Downloads.

- You can see the update download on the Downloads page.

Reinstall the Game or App
If the app can’t still open after updating the system and app, you can try reinstalling the app:
- Locate the game on your Home Page
- Press the Options button on your controller.
- Select Delete on the side menu.

After you delete the game, it will be available for re-downloading on your library. Try playing it again, and see if the error reappears. If it does, continue the tutorial.
Disable the PlayStation Camera
The problem may also occur if a PS Camera is connected to the system. The solution is unplugging the camera and rebooting the system:
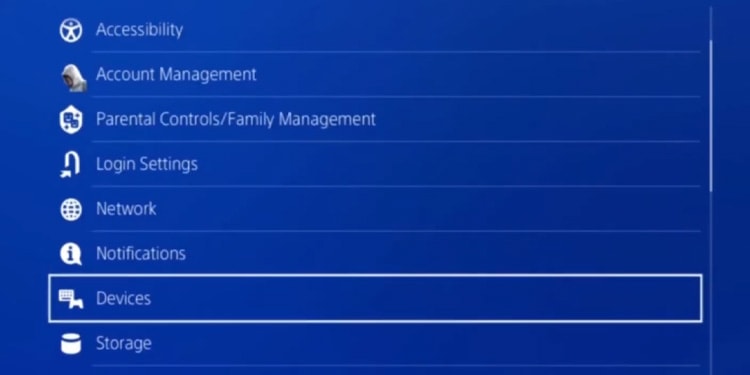
- Go to Settings.
- Select Devices.

- Turn off the camera.
Now, turn down the system, unplug all its cables for five minutes, and then turn it back on. This is a power cycle that erases the system cache.
The next part is:
- Go to Settings.
- Select Users.
- Select Logging Settings.

- Select Enable Face Recognition.

Delete Corrupted Data
The PS4 stores corrupted files in special folders. If the error is affecting the app, not the system, you can fix it by deleting the corrupted data:
Here’s the process:
- Go to Settings.
- Select System Storage Management.
- Select Saved Data.

- Select Media Player.

- Check every Corrupted Data item and hit Delete.

Corrupted data may include key files, so your console will probably need to re-download a percentage of the game or app after the fact.
Rebuild the Database
There’s a chance the console’s database is not working properly. As a result, the system can’t find the files it needs to open its games and apps. The solution is rebuilding the database.
We’re using the console’s Safe Mode troubleshooter for the process:
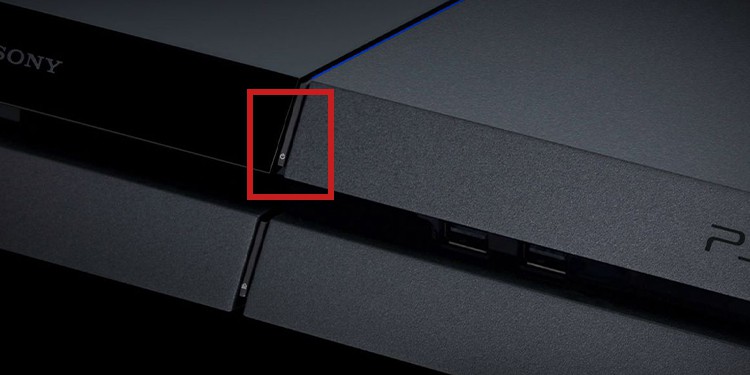
- Hold the console’s power button to shut down the PS4.

- Press and hold the console’s power button again for seven seconds. Release it after you hear a second beep.
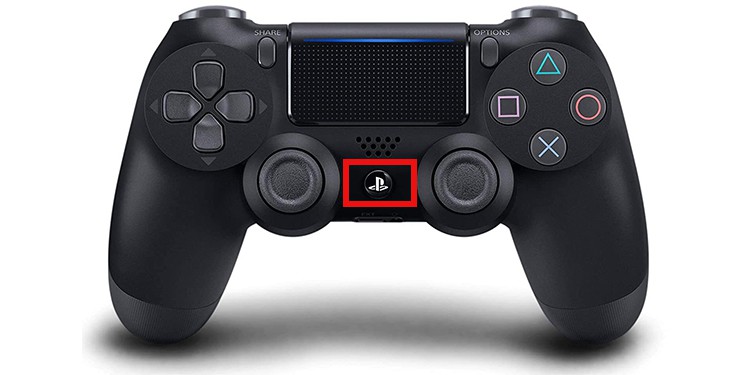
- Connect the DualShock 4 to the console with its USB cable.

- Press the PS button on the controller.

- On the Safe Mode menu, select option 5: Rebuild database.

Initialize the PS4
We’re initializing the PS4, a process that restores system settings to default. It will erase your data and apps, so we have a tutorial below on how to back up and restore your data.
For now,
- Go to Settings.
- Select Initialization.

- Select Initialize PS4.

- Follow the directions to complete the process.
There’s an alternative method to initialize the PS4, which you can follow if the interface doesn’t work, via the Safe Mode menu:
- Hold the console’s power button for three seconds to shut it off.

- To prevent bugs, unplug all of its cables for 5 minutes. This is a power cycle that will clear the system’s cache. After five minutes, plug everything back.
- Hold the console’s power button for about seven seconds until you hear a second beep.
- Plug the controller with its USB cable.

- Press the controller’s PS button.

- On the Safe Mode menu, select option 6: Initialize PS4.

Install Another Internal Storage Drive
The last piece of advice is to change your internal storage entirely. But here’s how it works: if you upgraded the HDD recently and you’re now experiencing issues, change it back. Otherwise, if you haven’t changed the storage and the problem doesn’t disappear, change it for a new one.
The process requires a Phillips head screwdriver or a T8 screwdriver. You can install a SATA SSD or an HDD; the storage can range from 250GB to 8TB. Lastly, either option needs to be as deep as 9.5mm.
Here’re our recommendations:
Consider backing up your data before following this tutorial. You can find information about it below.
Also, after installing the drive, you’ll need to install the operating system with a USB drive.
Install a New Internal Storage on the PS4
Here’re the instructions to install the drive:
- Shut down the PS4 and unplug everything.
- Put it on a flat surface.
- Take out the hard drive casing. You can slide it off easily.

- Locate the screw holding the drive bay in place. It may vary per PlayStation 4 model, but it usually has a PS symbol on top.
- Unscrew the PS screw.

- Take out the hard drive bay.

- The bay has four black screws on the sides. Take them out, but leave the rubber holders in their place.

- Take out the storage drive, and place another one in.
- Screw back the black screws on the side.

- Slide the bay back into place. It should “click” into place.
- Screw back the large screw to hold the bay in place.

- Slide the lid back into place.

Reinstall the PS4 System Software
You must reinstall the operating system with a USB drive or external storage:
- Find a USB drive with at least 6GB of empty storage.
- Plug the drive into a PC. Let’s say it’s a Windows PC to complete the tutorial.
- Go to This PC, right-click the drive, and select Format.
- Format it FAT32. You have to select FAT32 on File system, and click Start

- Create a “PS4 “inside the drive.
- Create an “UPDATE” folder inside “PS4.” Don’t use quotation marks on the names; the names should be exactly as you see them!

- Download the console reinstallation file on Sony’s page.
- Save “PS4UPDATE.PUP” inside “UPDATE”

- Unplug the USB drive from the PC.
- Ensure your PS4 is off.
- Press and hold its power button for seven seconds until you hear a second beep.

- Connect your controller to the console with its USB cable.

- Press the controller’s PS button.

- Select 7: Initialize PS4 (Reinstall System Software).

- Select Update from USB Storage Device.
- Plug the USB drive and confirm the process.
After the console reinstalls the software, it will restart and guide you through the initial setup. That means, for example, setting up your connection and logging in with your PSN credentials.
Then, when you reach the main menu, you can back up your data and play your apps and games. There shouldn’t be any more problems.


Be the first to comment