What if we told you pure aim and ability in VALORANT can only get you so far? If you’re realistic about grinding your way up to Radiant, you’ll realize that being able to actually communicate in-game could be the key to reaching your potential.
With that being said, sometimes the in-game map and VALORANT’s ping system just aren’t enough. So we’re creating callout guides for all of the maps in VALORANT, starting with Ascent.
Here’s the full guide to the layout of Ascent, the general and specific callout locations, and some basic tips and strats for attacking and defending each site.
Ascent layout and callouts
Above is the in-game map for Ascent, with most of the basic callouts listed for you. But there are a few site-specific callouts that aren’t included on this overlay that you should be aware of.
Ascent A site callouts, strats, and tips

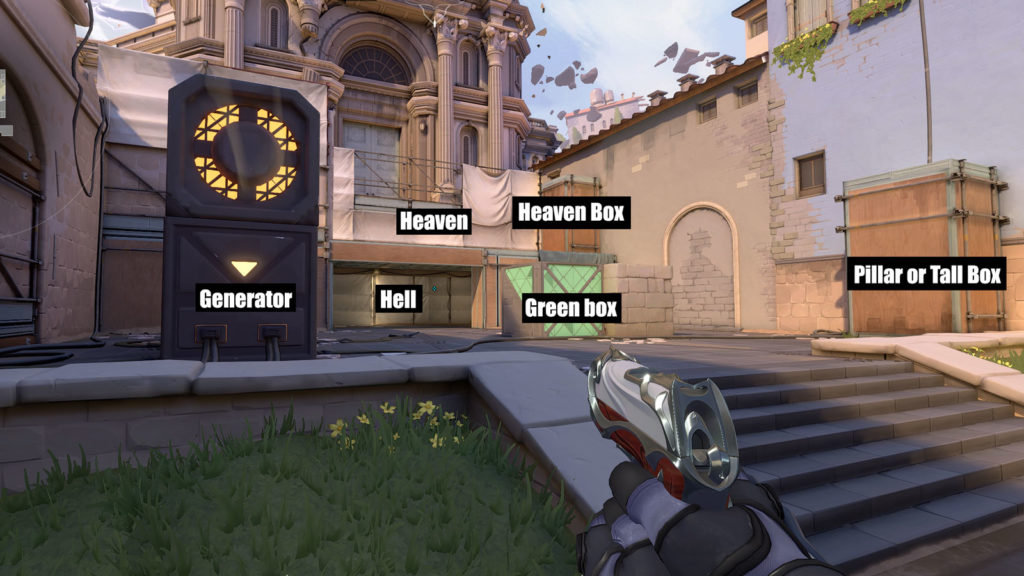
Here are the basic callout locations you should know for Ascent’s A site. Outside of Generator and the bricks next to Green Box, it’s important to remember that most of these surfaces are spammable, including the divider between Heaven and Hell. There are a few other A-related callouts you should be aware of, though.
- Bricks: In the corner to your right if you’re entering site through the A main entrance.
- Door and Panel: In the corner to your left if you’re entering site through the A main entrance.
On attack, you want to cut off the ability for defenders to peek from corners in Heaven, Hell, and from behind Door during a site take. Smokes or a Viper wall will accomplish this the best, or you can try to rely on flashes to get from A main into the site. Closing the door as soon as you have site control is a must since it cuts off a retake angle from the defenders, forcing them to break it and give themselves away.
Defense is rather simple since it’s easy to set up crossfire placements on A site. You can post players behind Door, behind Pillar, behind Generator, in Hell, or by Bricks, and timing your peeks when attackers enter the site should ensure trades. For retakes, the best option is to come through Heaven, cut off the A main entrance with smokes if you can, then clear out Hell first.
Ascent B bite callouts, strats, and tips


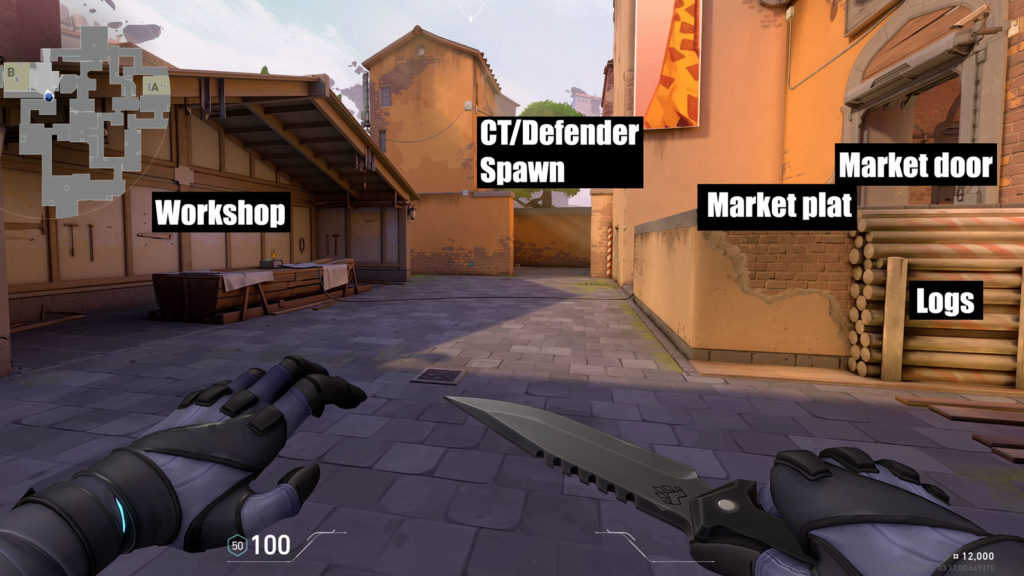
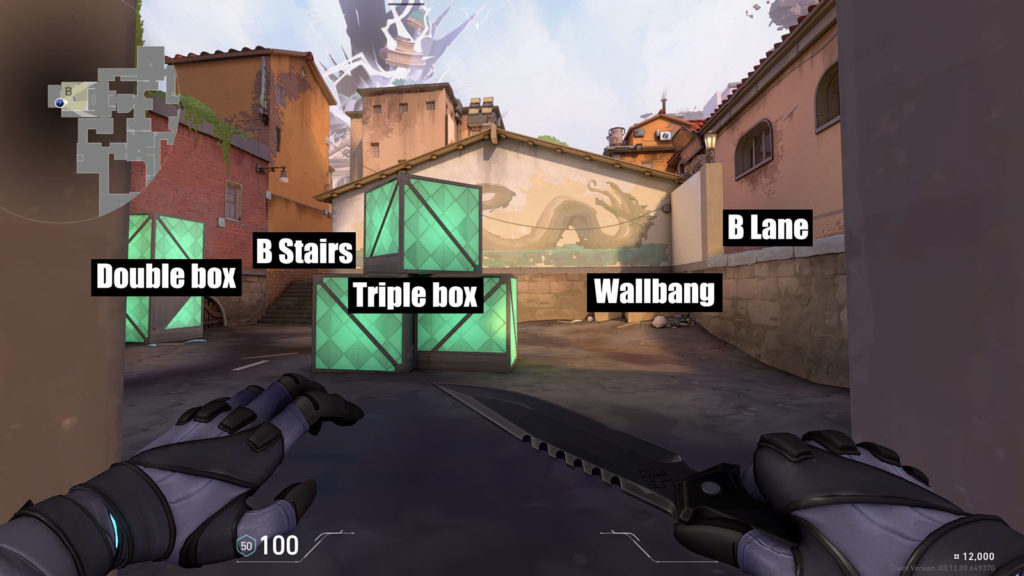
Here are the basic callout locations you should know for Ascent’s B site. Like on the A site, several of these surfaces are spammable. In-game, the spot the player is standing in during the second screengrab is technically called Boathouse, but most players refer to it as Back Site.
Like on A, the attackers want to choke off the angles where defenders can peek and retreat from, namely the CT/Defender Spawn entrance and the Market door. This should let you get control of either B Lane or Workshop. From there, you should use flash, grenade, or molotov abilities to clear out the different hiding spots like Wallbang, Double Box, and Back Site.
On defense, you want to ensure control of the B main entrance, either by using recon abilities or by playing aggressively. Using recon abilities like Sova’s drone, Skye’s dogs, or KAY/O’s knife is your best bet since revealing the attackers gives you a chance to use the infamous wall-bang spot from B Lane into the B main entrance. For retakes, the layout of the site almost always forces the attackers to hide in Back Site, so clear out potential lurkers in either B main or Market before you commit to a retake.
As for overall Ascent tips, like most maps, mid control is important. For attackers, it gives them the flexibility to set up a double-pronged attack on any site or plant a lurker deep in the defender spawn to backstab the enemy team. For defenders, it gives them the gift of information since they can push up to Mid Top or Mid Link to determine which site the attackers are going to, giving their teammates a chance to rotate quickly and stack up.

Be the first to comment